
Now that your Images/Photos are renamed, resized and we have a basic understanding of file structure we can look at uploading our web photos into the shopping cart.
There are two options available for uploading photos into the cart (images/folder)

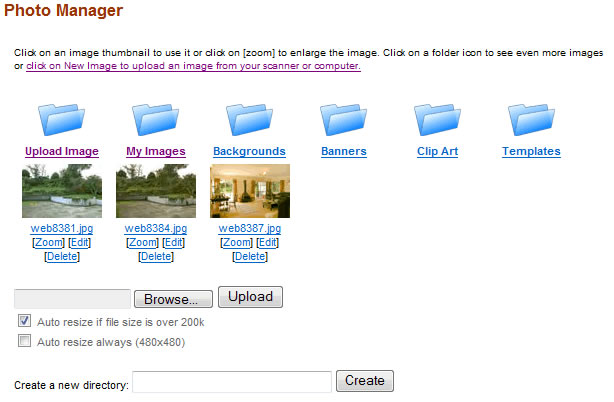
Uploading Single Photos one at a time
The first option allows you to upload directly into the designated folder one image at a time. Using our standard browse, select and upload option, you can also create subfolders with in the designated folder then navigate between them to upload different images into different folders (genres, styles etc)
Using FTP for Bulk uploading
The Second option refers to FTP (File Transfer Protocol), Using 3rd party software you can log into the file directory of your site and access your images folder directly, giving you the ability to upload large numbers of photos all at once.
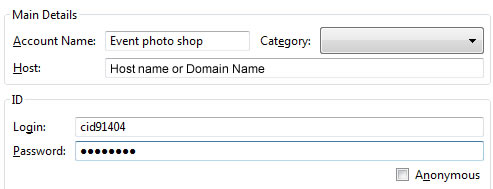
Click on the link “Ftp Details” this will take you to your FTP Management area on our system which will provide you with information and access details. Plus you will find under tool tips a list of FTP software programs that we recommend
Use the Classic FTP Details provided on this page to set up in your FTP Client. If you feel that the auto generated password provided is too long then please specify a new one at the bottom of the page

Your classic FTP Details have three elements FTP Host, Username and password.
Your FTP client will request these details to make a connection to our server and your web space file directory.
Once you have established a connection with your FTP Client Software you should be displayed with a split screen the left being the file directory of your computer the right the file directory of your website.
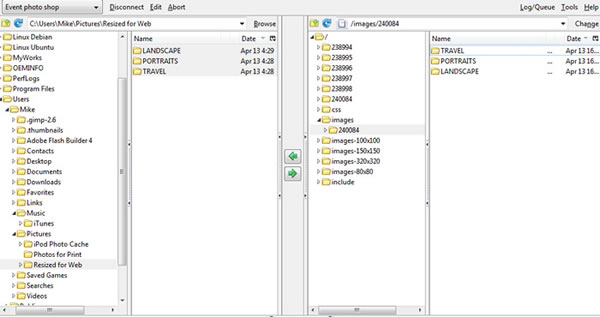
On the left navigate through your computers file directory to the Folder containing your resized web photos. On the right navigate to the “images” folder, then to the folder designated by the system for your photographers shopping cart which is a series of numbers. If you have forgotten the folder name then go back to “Web Pages” and edit the photo Shopping cart page you created. The folder number will be displayed on that page
Now you can copy the contents from your computer on the left to the correct folder on the right side, this method allows you to upload all images and folders in one go.